Changing a Label: Difference between revisions
Updated by push_wiki.py |
Updated by push_wiki.py |
||
| Line 60: | Line 60: | ||
# Set '''Report Type''' to '''Label'''. This tells Commander4j the file is a printer template rather than a standard report. Print Preview is not available for labels. | # Set '''Report Type''' to '''Label'''. This tells Commander4j the file is a printer template rather than a standard report. Print Preview is not available for labels. | ||
# In '''Report Filename''' press the '''...''' button and choose your file from the <code>labels</code> folder. | # In '''Report Filename''' press the '''...''' button and choose your file from the <code>labels</code> folder. | ||
# | # Beneath Report Type are the printer settings for the label: '''Group ID''' (Pallet), '''Printer Type''' (Zebra), '''Language''' (ZPL) and '''DPI''' (300), with '''Direct Print''' on the right. These must match the printer you will choose in the next step, otherwise the printer is not offered on the Pallet Label screen. | ||
# Press '''Save'''. | # Press '''Save'''. | ||
[[file:Module_Pallet_Report2.png|link=|600px]] | |||
If several labels are in use at your site, check [[Label Layouts#Which label file is used|which label file is used]] before editing RPT_PALLET_LABEL, because a material type, material or customer may be pointing at a different module. | If several labels are in use at your site, check [[Label Layouts#Which label file is used|which label file is used]] before editing RPT_PALLET_LABEL, because a material type, material or customer may be pointing at a different module. | ||
Revision as of 11:36, 15 October 2026
Changing a Label walks through the smallest useful change to a pallet label: copying the standard Zebra template, altering one thing, checking it on screen, and telling Commander4j to use it. It takes about half an hour the first time. If you have never seen a label template before, read Label Layouts first.
The walk-through uses a Zebra printer because the free ZPL Renderer lets you see the result without printing anything. The steps are the same for other printer makes except that you cannot preview.
Before you start
- You can log in to Commander4j with a user that has access to Administration › Setup › Modules and Pallet Transactions › Setup › Label Printers.
- You know where Commander4j is installed. The label templates live in the
labelsfolder underneath it; see Folder Structure. - You have a plain text editor. Notepad on Windows or TextEdit on a Mac is fine. Do not use Word.
- For the preview step, install ZPL Renderer from the Downloads page on any PC on the same network. The Commander4j PC itself is simplest.
Step 1. Copy the standard template
In the labels folder find
zebra_300dpi_pallet_label_a5_standard.lbl
and copy it to a new name, for example
zebra_300dpi_pallet_label_mysite.lbl
Always work on a copy. The standard file is replaced when Commander4j is upgraded, and a copy with your own name is left alone.
Step 2. Make one change
Open your copy in the text editor. It is a mixture of three things:
- Lines beginning with
/*are comments. They describe the block that follows and are never sent to the printer. - Zebra commands such as
^FO(position) and^A0N,100,100(font and size). Each line draws one thing. - Placeholders such as
<*DESCRIPTION*>, which Commander4j swaps for the real value. The full list is on Label Fields.
Here are three safe changes. Pick one.
Change a caption. Find the line
^FO900,1300^A0N,50,50^CI27^FDBEST BEFORE (MM YYYY)^FS
The text after ^FD is what prints. Change it to USE BY (MM YYYY). Leave everything before ^FD alone.
Change a date format. Find the line
^FO1085,1360^A0N,100,100^CI27^FD<EXPIRYDATE(MM)> <EXPIRYDATE(yyyy)>^FS
and replace the two functions with one: <EXPIRYDATE(dd/MM/yyyy)>. The caption above it should then be changed to match. The letters inside the brackets are explained in Label Function Syntax.
Make text bigger. In ^A0N,100,75 the two numbers are the height and width of the characters in printer dots. Increase both to make the text larger, and remember that wider text needs more room before it runs into the next field.
Save the file as plain text with the .lbl extension.
Step 3. Check the layout on screen
Open ZPL Renderer, set the DPI to 300 and the label size to match your stock, and open your .lbl file with the Open button. You will see the label with the placeholder names printed where the values will go, and the barcodes will not be meaningful because they have not yet been filled in. That is expected. This check is for position, font size and spelling only.
Edit the file, save it, and press Refresh in ZPL Renderer to see the change.
Step 4. Tell Commander4j to use your file
- Log in to Commander4j and open Administration › Setup › Modules.
- Set the type filter to Reports and find RPT_PALLET_LABEL. Double-click it, or select it and press Edit.
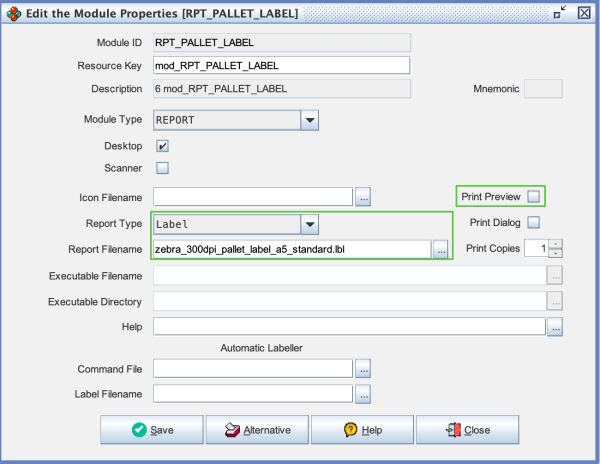
- Set Report Type to Label. This tells Commander4j the file is a printer template rather than a standard report. Print Preview is not available for labels.
- In Report Filename press the ... button and choose your file from the
labelsfolder. - Beneath Report Type are the printer settings for the label: Group ID (Pallet), Printer Type (Zebra), Language (ZPL) and DPI (300), with Direct Print on the right. These must match the printer you will choose in the next step, otherwise the printer is not offered on the Pallet Label screen.
- Press Save.
If several labels are in use at your site, check which label file is used before editing RPT_PALLET_LABEL, because a material type, material or customer may be pointing at a different module.
Step 5. Print with real data to the screen
This step uses ZPL Renderer as a pretend printer, so you see the label filled in with a real pallet's values without using any label stock.
- In ZPL Renderer press the Network button. It now listens on port 9100, the same port a real Zebra printer uses.
- In Commander4j open Pallet Transactions › Setup › Label Printers and press Add. Give it an ID such as PREVIEW and choose the Pallet group.
- Set Printer Type to Zebra, Language to ZPL, DPI to 300, a paper size that matches your stock, the IP address of the PC running ZPL Renderer (127.0.0.1 if it is the same PC) and port 9100. Tick Enabled and Direct Print, then Save.
- Open the Pallet Label screen, pick a process order, choose PREVIEW in the device drop-down and press Label.
The filled-in label appears in ZPL Renderer. If PREVIEW is missing from the drop-down, compare the five settings on the printer with the ones on the module in step 4; they have to agree. See Label Printers.
Note that printing to PREVIEW still creates a pallet record and uses an SSCC number, exactly as a real print would. Use a test process order.
Step 6. Go live
Once you are happy, choose the real printer on the Pallet Label screen instead of PREVIEW. You can leave the PREVIEW printer defined for next time, or untick Enabled so operators do not pick it by mistake.
Keep a copy of your .lbl file somewhere outside the Commander4j folder. It is the only record of your label design.
Going further
- To add a value that is not on the standard label, find its name on Label Fields, copy an existing text line and change the position and placeholder.
- To change what is encoded in a barcode, read the DEFINE BARCODE section of Label Template Syntax first. The GS1 rules are strict and a customer's scanner will reject a barcode that breaks them.
- Zebra ZPL Label explains the standard template block by block.
- The Zebra ZPL Programming Guide describes every command.