Pallet Label: Difference between revisions
No edit summary |
No edit summary |
||
| (4 intermediate revisions by the same user not shown) | |||
| Line 1: | Line 1: | ||
[[Category:Commander4j]] | |||
See also [[Production Declaration]] and [[Production Confirmation]] | See also [[Production Declaration]] and [[Production Confirmation]] | ||
[[file:Pallet label2.png|600px]] | [[file:Pallet label2.png|link=|600px]] | ||
The above screen is used to print Pallet Labels (labels which include a unique Serial Shipping Container Code - SSCC). The number sequence used is define in the [[System Keys]] screen. | The above screen is used to print Pallet Labels (labels which include a unique Serial Shipping Container Code - SSCC). The number sequence used is define in the [[System Keys]] screen. | ||
| Line 14: | Line 15: | ||
| 1 || Process Order or Works Order Number can be typed in or picked using the lookup button. | | 1 || Process Order or Works Order Number can be typed in or picked using the lookup button. | ||
|- | |- | ||
| 2 || Process Order Status is shown in | | 2 || Process Order Status is shown in <span style="color:#FFFFFF; background:#ff0000">RED</span> if the order is closed. | ||
|- | |- | ||
| 3 || Date of Manufacture will default to the computers system clock but you can amend it manually if necessary. The expiry date of the pallet is calculated by adding the shelf life to the date of manufacture. | | 3 || Date of Manufacture will default to the computers system clock but you can amend it manually if necessary. The expiry date of the pallet is calculated by adding the shelf life to the date of manufacture. | ||
| Line 38: | Line 39: | ||
[[file:Pallet_Label_Preview2.png|600px]] | [[file:Pallet_Label_Preview2.png|link=|600px]] | ||
Examples of a pallet labels Zebra XiIII Plus (300dpi) **left** and Intermec IPL (200dpi) **right** | Examples of a pallet labels Zebra XiIII Plus (300dpi) **left** and Intermec IPL (200dpi) **right** | ||
[[file:Zebra_Intermec_Pallet.png|600px]] | [[file:Zebra_Intermec_Pallet.png|link=|600px]] | ||
| Line 59: | Line 60: | ||
[[file:Module_Admin_Menu.png|600px]] | [[file:Module_Admin_Menu.png|link=|600px]] | ||
The screens below show how to switch pallet label types and reports. You should note that the Modules database is used to define screens as well as reports. To help reduce the number of items in the list you can filter them using the module type as shown here. | The screens below show how to switch pallet label types and reports. You should note that the Modules database is used to define screens as well as reports. To help reduce the number of items in the list you can filter them using the module type as shown here. | ||
[[file:Module_Admin1.png|600px]] | [[file:Module_Admin1.png|link=|600px]] | ||
Select the report called "RPT_PALLET_LABEL" and click on the edit button. | Select the report called "RPT_PALLET_LABEL" and click on the edit button. | ||
[[file:Module_Pallet_Report1.png|600px]] | [[file:Module_Pallet_Report1.png|link=|600px]] | ||
[[file:Module_Pallet_Report2.png|600px]] | [[file:Module_Pallet_Report2.png|link=|600px]] | ||
Latest revision as of 11:26, 23 August 2024
See also Production Declaration and Production Confirmation
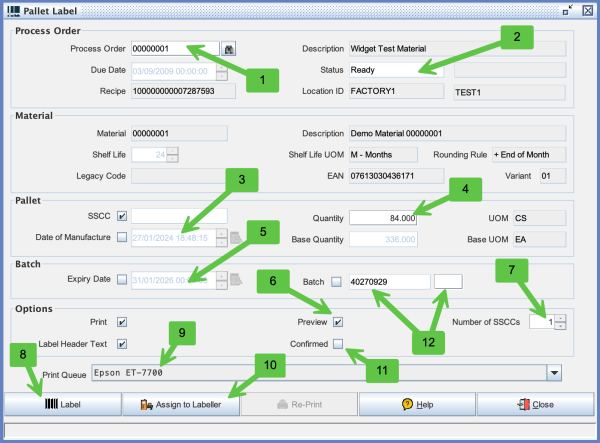
The above screen is used to print Pallet Labels (labels which include a unique Serial Shipping Container Code - SSCC). The number sequence used is define in the System Keys screen.
There are two methods to print a label depending on the type or printer/labeller that you want to use and this is described in the Pallet Label page.
| Field | Description |
|---|---|
| 1 | Process Order or Works Order Number can be typed in or picked using the lookup button. |
| 2 | Process Order Status is shown in RED if the order is closed. |
| 3 | Date of Manufacture will default to the computers system clock but you can amend it manually if necessary. The expiry date of the pallet is calculated by adding the shelf life to the date of manufacture. |
| 4 | The screen determines what a full pallet quantity would contain by reference to Material UOMs |
| 5 | Expiry Date is calculated by adding the Shelf Life settings found in the Materials screen to the Date of Manufacture but you can override if necessary. |
| 6 | Preview is only applicable for "Standard" reports which are created for any printer. If you change the PALLET_LABEL module to use a Zebra ZPL compatible Label then you won't be able to preview the label on screen. |
| 7 | Number of SSCC's is not necessarily the same as number of labels. Some reports will print labels in pairs so 1 SSCC = 2 labels which have the same SSCC. This is common place as placing a pallet label on 2 difference faces of a pallet makes it more likely that at least one will be visible at all times. |
| 8 | The Label button is used to generate a label and sent it do the printer from the desktop client and is subtly different to the Assign to Labeller button (10) which is used to drive external labelling applications such as the AutoLab4j application. |
| 9 | This is the name of the print queue that you want the label to be sent to when using the Label button (8). It is important to understand the difference between the type types of label printing mechanisms and the print queue requirements. See Printer Queues |
| 10 | See Process Order Assign to Labeller |
| 11 | The Confirmed Status checkbox is important as it triggers the generation of an outbound Production Declaration message. You have 2 options here. If you want to print all your labels in advance you can leave the confirmed checkbox unselected - you can then confirm each pallet using the Production Confirmation transaction on the desktop or scanner. If you want you can confirm as you print. The deciding factory comes back to traceability. If you want the date of manufacture to be accurate you should not confirm the pallet label when it is printed but do it when the pallet is actually ready to have the label applied. |
| 12 | The structure - content of the Batch Number gets its default format from the System Keys screen. However you can override it on the Customers screen. This allows the content of the label to be different depending on which customer id is assigned to the Process Orders |
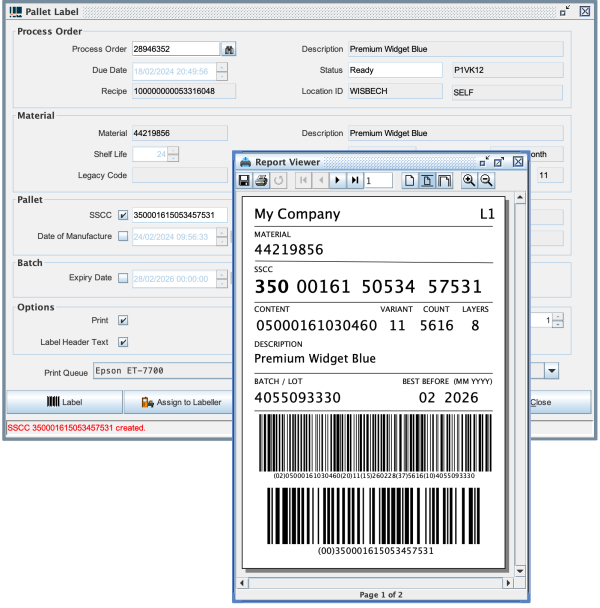
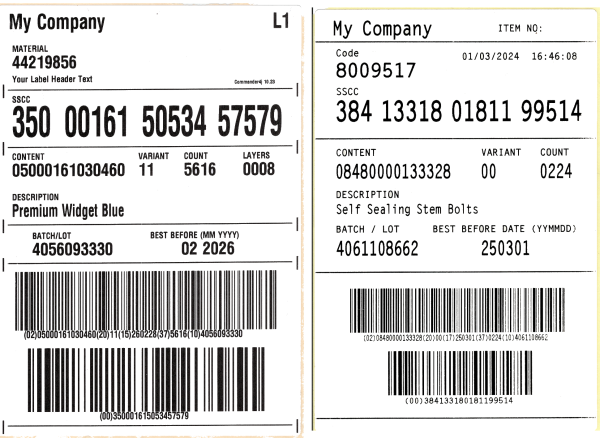
Examples of a pallet labels Zebra XiIII Plus (300dpi) **left** and Intermec IPL (200dpi) **right**
Labels designed for barcode printers rather than general reports are defined within the Labels folder. For example label definitions look at the Label Template Syntax page.
For the actual steps to print a label you should see the Pallet Label documentation.
However you should be aware that there are two main methods for the application to send data to a printer which depends on the type of printer or labeller that you want to use.
The default config after installing will be a label which can be sent to any standard desktop printer and has the advantage that when you print the label you have the option of displaying the label on screen.
If you have a Zebra compatible barcode printer you can amend the configuration so that it sends ZPL commands to that printer. This will be faster to print and the quality of the barcode will be better.
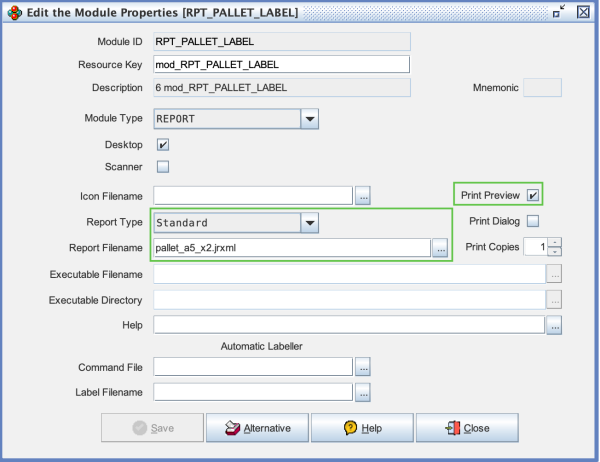
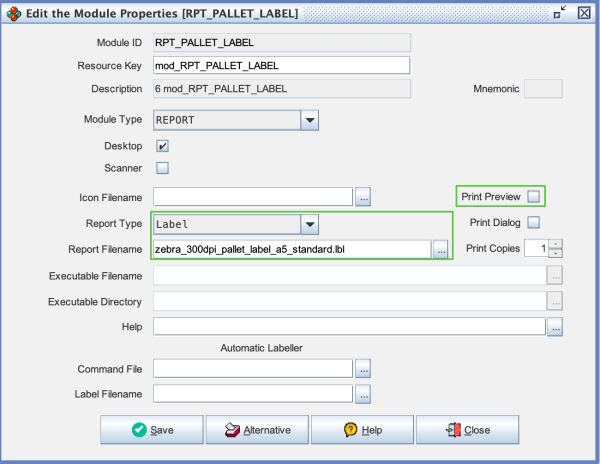
The following screens show how to change the report type. You can also create your own layout but that will be described in a different page.

The screens below show how to switch pallet label types and reports. You should note that the Modules database is used to define screens as well as reports. To help reduce the number of items in the list you can filter them using the module type as shown here.
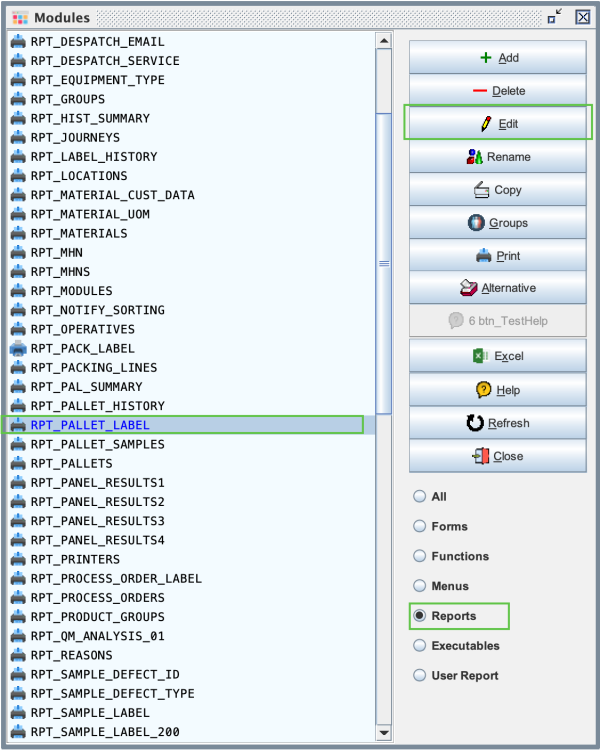
Select the report called "RPT_PALLET_LABEL" and click on the edit button.
