Case Label: Difference between revisions
Created page with "600px The above screen is used to print Case Labels. <br><br> There are two methods to print a label depending on the type or printer/labeller that you want to use and this is described in the Pallet Label Printing page. <br><br> | Field | Description | | :-: | :- | | 1 | Process Order or Works Order Number can be typed in or picked using the lookup button. | | 2 | Process Order Status is shown in $\color{red}{\textsf{RED}}$ if the order is..." |
No edit summary |
||
| (8 intermediate revisions by 2 users not shown) | |||
| Line 1: | Line 1: | ||
[[file:Case_Label.png| | [[Category:Commander4j]] | ||
[[file:Case_Label.png|link=|700px]] | |||
The above screen is used to print Case Labels. | The above screen is used to print Case Labels. | ||
<br><br> | <br><br> | ||
There are two methods to print a label depending on the type or printer/labeller that you want to use and this is described in the [[Pallet Label | There are two methods to print a label depending on the type or printer/labeller that you want to use and this is described in the [[Pallet Label]] page. | ||
< | |||
{| class="wikitable" style="margin:auto" | |||
|+ Case Label | |||
|- | |||
! Field !! Description | |||
|- | |||
| 1 || Process Order or Works Order Number can be typed in or picked using the lookup button. | |||
|- | |||
| 2 || Process Order Status is shown in <span style="color:#FFFFFF; background:#ff0000">RED</span> if the order is closed. | |||
|- | |||
| 3 || Date of Manufacture will default to the computers system clock but you can amend it manually if necessary. The expiry date of the pallet is calculated by adding the shelf life to the date of manufacture. | |||
|- | |||
| 4 || The screen determines what a full pallet quantity would contain by reference to [[Material UOMs]] | |||
|- | |||
| 5 || Expiry Date is calculated by adding the Shelf Life settings found in the [[Materials]] screen to the Date of Manufacture but you can override if necessary. | |||
|- | |||
| 6 || Preview is only applicable for "Standard" reports which are created for any printer. If you change the PALLET_LABEL module to use a Zebra ZPL compatible Label then you won't be able to preview the label on screen. | |||
|- | |||
| 7 || Number of labels. | |||
|- | |||
| 8 || The Label button is used to generate a label and sent it do the printer from the desktop client and is subtly different to the Assign to Labeller button (10) which is used to drive external labelling applications such as the [https://github.com/C4J/Commander4j-AutoLab/releases AutoLab4j] application. | |||
|- | |||
| 9 || This is the name of the print queue that you want the label to be sent to when using the Label button (8). It is important to understand the difference between the type types of label printing mechanisms and the print queue requirements. See [[Printer Queues]] | |||
|- | |||
| 10 || See [[Process Order Assign to Labeller]] | |||
|- | |||
| 11 || The structure - content of the [[Batch Number]] gets its default format from the [[System Keys]] screen. However you can override it on the [[Customers]] screen. This allows the content of the label to be different depending on which customer id is assigned to the [[Process Orders]] | |||
|} | |||
[[file: Case_Label_Preview.png| | [[file: Case_Label_Preview.png|link=|800px]] | ||
Latest revision as of 15:32, 2 September 2024
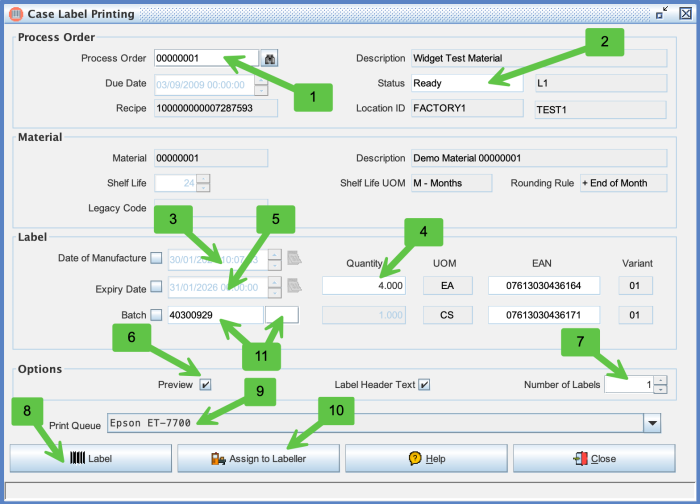
The above screen is used to print Case Labels.
There are two methods to print a label depending on the type or printer/labeller that you want to use and this is described in the Pallet Label page.
| Field | Description |
|---|---|
| 1 | Process Order or Works Order Number can be typed in or picked using the lookup button. |
| 2 | Process Order Status is shown in RED if the order is closed. |
| 3 | Date of Manufacture will default to the computers system clock but you can amend it manually if necessary. The expiry date of the pallet is calculated by adding the shelf life to the date of manufacture. |
| 4 | The screen determines what a full pallet quantity would contain by reference to Material UOMs |
| 5 | Expiry Date is calculated by adding the Shelf Life settings found in the Materials screen to the Date of Manufacture but you can override if necessary. |
| 6 | Preview is only applicable for "Standard" reports which are created for any printer. If you change the PALLET_LABEL module to use a Zebra ZPL compatible Label then you won't be able to preview the label on screen. |
| 7 | Number of labels. |
| 8 | The Label button is used to generate a label and sent it do the printer from the desktop client and is subtly different to the Assign to Labeller button (10) which is used to drive external labelling applications such as the AutoLab4j application. |
| 9 | This is the name of the print queue that you want the label to be sent to when using the Label button (8). It is important to understand the difference between the type types of label printing mechanisms and the print queue requirements. See Printer Queues |
| 10 | See Process Order Assign to Labeller |
| 11 | The structure - content of the Batch Number gets its default format from the System Keys screen. However you can override it on the Customers screen. This allows the content of the label to be different depending on which customer id is assigned to the Process Orders |
