Install Interface Services: Difference between revisions
No edit summary |
No edit summary |
||
| (3 intermediate revisions by the same user not shown) | |||
| Line 1: | Line 1: | ||
[[Category: Commander4j]] | |||
== Windows Service Installation == | == Windows Service Installation == | ||
| Line 9: | Line 10: | ||
You will then need to confirm that you want to run the program with admin permissions. | You will then need to confirm that you want to run the program with admin permissions. | ||
[[file:Service_Install.png| | [[file:Service_Install.png|500px]] | ||
When the command prompt (terminal) is opened you will see a window like the one shown below. | When the command prompt (terminal) is opened you will see a window like the one shown below. | ||
| Line 22: | Line 23: | ||
In the example above we have used a parameter called "Commander4j_Interfaces" but we could have chosen a different name as long as it did not contain any spaces. If you planning to install more than one copy of Commander4j on the server you may choose to use a different names. | In the example above we have used a parameter called "Commander4j_Interfaces" but we could have chosen a different name as long as it did not contain any spaces. If you planning to install more than one copy of Commander4j on the server you may choose to use a different names. | ||
[[file:Services1.png| | [[file:Services1.png|500px]] | ||
We now need to make some changes to the service we have created so that it will have the necessary permission to read and write files on the local hard disk and possibly your network. Run the Services app from the Start menu. | We now need to make some changes to the service we have created so that it will have the necessary permission to read and write files on the local hard disk and possibly your network. Run the Services app from the Start menu. | ||
[[file:Services2.png| | [[file:Services2.png|500px]] | ||
In the Services app you will see the names of the services listed (typically in alphabetical order). Find the service we just created "Commander4j_Interfaces" | In the Services app you will see the names of the services listed (typically in alphabetical order). Find the service we just created "Commander4j_Interfaces" | ||
[[file:Services3.png| | [[file:Services3.png|500px]] | ||
By default the service we have just created is running under a local system account. If the interface service has to read and write messages to specific folders including network shares then we need to change the name of the account which the service logs on as to one that has permissions to read/write to those locations. | By default the service we have just created is running under a local system account. If the interface service has to read and write messages to specific folders including network shares then we need to change the name of the account which the service logs on as to one that has permissions to read/write to those locations. | ||
[[file:Services4.png| | [[file:Services4.png|500px]] | ||
Lastly but very importantly we need to tell the interface service which of the host (database) connections to use. | Lastly but very importantly we need to tell the interface service which of the host (database) connections to use. | ||
Each interface service (windows service) can only process messages for a single database, therefore, if you have more than one commander4j database then you will need to install addition copies of the software into different directories. | Each interface service (windows service) can only process messages for a single database, therefore, if you have more than one commander4j database then you will need to install addition copies of the software into different directories. | ||
Latest revision as of 10:31, 25 August 2024
Windows Service Installation
In order to create the service we need to run a program from the Command Prompt with Administrator permissions. From the Start menu start typing "Command" and when the Command Prompt option appears select the "Run as Administrator" option.
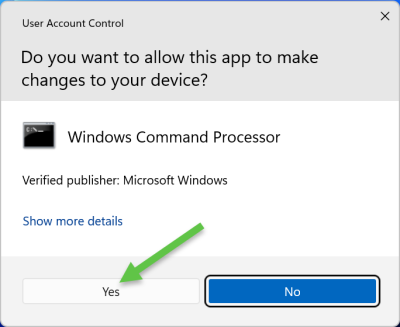
You will then need to confirm that you want to run the program with admin permissions.
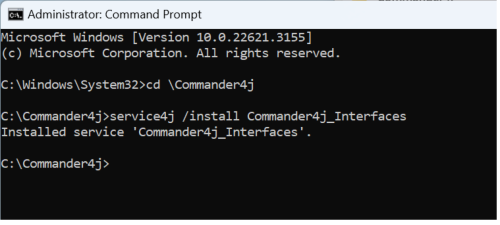
When the command prompt (terminal) is opened you will see a window like the one shown below. We now need to change into the folder where we installed Commander4j. To do this we use the CD "change directory command" like this
Once you have changed into the folder we need to run the program Service4j with 2 parameters.
Once you have changed into the folder we need to run the program Service4j with 2 parameters.
service4j /install Commander4j_Interfaces
In the example above we have used a parameter called "Commander4j_Interfaces" but we could have chosen a different name as long as it did not contain any spaces. If you planning to install more than one copy of Commander4j on the server you may choose to use a different names.
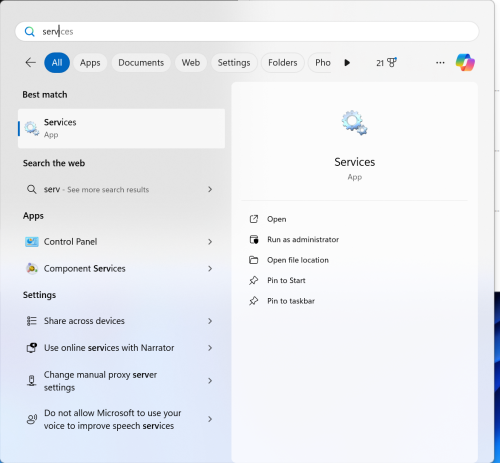
We now need to make some changes to the service we have created so that it will have the necessary permission to read and write files on the local hard disk and possibly your network. Run the Services app from the Start menu.
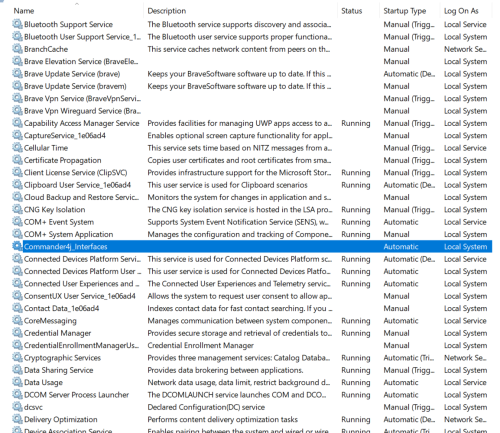
In the Services app you will see the names of the services listed (typically in alphabetical order). Find the service we just created "Commander4j_Interfaces"
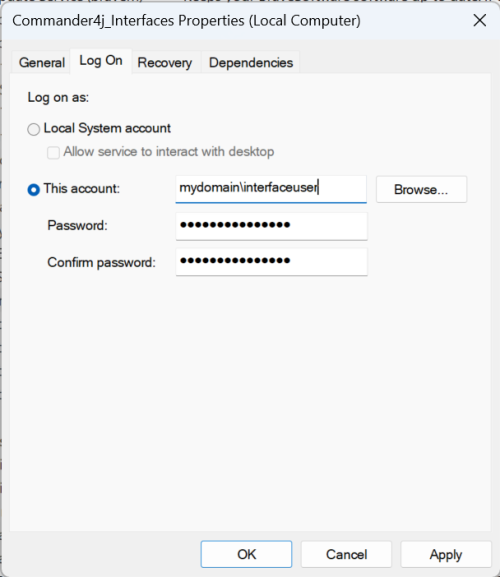
By default the service we have just created is running under a local system account. If the interface service has to read and write messages to specific folders including network shares then we need to change the name of the account which the service logs on as to one that has permissions to read/write to those locations.
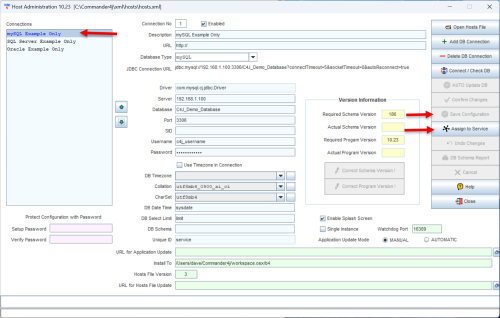
Lastly but very importantly we need to tell the interface service which of the host (database) connections to use.
Each interface service (windows service) can only process messages for a single database, therefore, if you have more than one commander4j database then you will need to install addition copies of the software into different directories.
